Friday, April 29, 2016
Thursday, April 28, 2016
Beginner snail mail flip book #2
My second snail mail flip book and it is such fun to make. I printed some free journal cards and cut them with a scissor. The snail mail flip book is stuffed with die cuts, coloured sweet pea rubber stamps. Some fun paper clips are added also and a lot of washi tape. Thank you for visiting my blog!
Private swap 12 Tags of 2016 ~ April
Yes, it is my second decorated tag based on the techniques of Tim Holtz. I banned from the swap, because as a new swapper her profile was not filled. We've had a couple of swap flakers, so I am careful with participants without a well filled profile at swap-bot.
She sent me a message and it seemed that she was in the process of writing her profile. She also had her tag decorated and ready to be send. Awkward, isn't it? I offered her to swap with her, which will be a private swap. After some messages I set up a private swap. I am looking forward to her decorated tag. Now I have finished my decorated tag for her; here is it!
Ingredients:
card board
A child's year - bird @ 3"
modelling paste
sugar - mixed with the modelling paste
designer paper (wood design)
pieces of paper and handmade paper
embossing folder
ranger distress ink ~ vintage photo
Close to my heart ink pad ~ chocolate
water
3D crystal lacquer
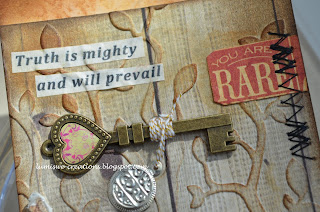
metals ~ key, medal
vintage cotton ribbon
12 Tags of 2016 ~ April
A decorated tag based on fabulous mix of techniques s.a. faux mosaic and paint resist and ink embossing. I am not so fond of mosaic art, but I do like the layered bird. I created to decorated tags using the same techniques and materials, but they are still so different and so unique!
Ingredients:
card board
A child's year - bird @ 3"
modelling paste
sugar - mixed with the modelling paste
designer paper (wood design)
pieces of paper and handmade paper
embossing folder
ranger distress ink ~ vintage photo
Close to my heart ink pad ~ chocolate
water
3D crystal lacquer
metals ~ key, medal
vintage cotton ribbon
Monday, April 25, 2016
Handmade card sketch #5
For this card I also used the Florals embellished cartridge. The purple flower is a die cut flower and the butterfly is a Stampin' Up die cut. The greeting is from sweetpea rubberstamps. And yes, layered the butterfly with glitter from my zig wink of Stella brush. It is such a cute butterfly! This is another cute card with fresh colours.
the sketch
the sketch
Missing Spring and the sun!
And I am also missing the beautiful flowers in nature. So I created one for myself:) Using Florals embellished cartridge and cut the flower at 5; the greeting is cut at 2,5".
Tuesday, April 19, 2016
Julie N. Prima Doll #8 - sender's choice
At first I didn't know where to start;( I selected the doll, checked my swap partners profile and went ahead;)) Using copic markers to colour the doll. The background has quite some layers s.a. gesso, acrylic paints, designer card stock, ink, modelling paste, Ranger ice stickles, Colours unlimited pearl gel, rubber stamps (doll and journaling), cut outs and a wooden butterfly.
Little mermaid
My last postcard for today is also an easy handmade postcard. Again using card board, designer paper and card stock. Also rubber stamps from the greeting farm and sweetpea rubber stamps. The ink is from Stampin' Up ~ garden green. Easy, but so cute:)
Greetings
Not my last postcard;) This one is quite easy using card board, designer paper, washi tape and a whiff of joy rubber stamp colored with copic markers. The designer paper is a nice match to the image, which I had already colored and the wind is blowing the flowers in the same directions as which she runs.
Oh!
Another postcard using vlv rubber stamp image colored with Prisma color pencils. I also used these old, but once famous Sizzix Alphabet cutting dies ~ the classing set and the shadow box punctuation set, for the greeting on the postcard.
Subscribe to:
Comments (Atom)


